


What you Need to Know about Wood Flooring Spline
By Brett Miller
Spline is a challenging subject. For starters, it plays one exclusive role within an installation, which is never seen nor appreciated by the end-user. Spline is also one of the most critical components of any properly installed wood floor.
Spline is known by many names, depending on geography and what you were originally taught to call it. Some common names include slip-tongue, false-tongue, loose-tongue and tongue-spline.
The singular purpose of wood floor spline is simply to allow two pieces of wood flooring to be joined together to make a single flat surface, while maintaining consistent tongue and groove engagement through the entire installation.
For most wood floor installations, spline should be a regular component of what is delivered to every job site. It is required anytime the wood floor installation has direction changes; when reversing installation direction, such as starting in the centre of a layout or back-filling; at all headers or flush transitions; and when installing or assembling any parquet pattern where two pieces of wood adjoin.
One of the most important elements of spline is how it matches the specific flooring profile. Not all splines fit the same groove profile of all flooring. Three-quarter inch spline is readily available at most flooring distributors.
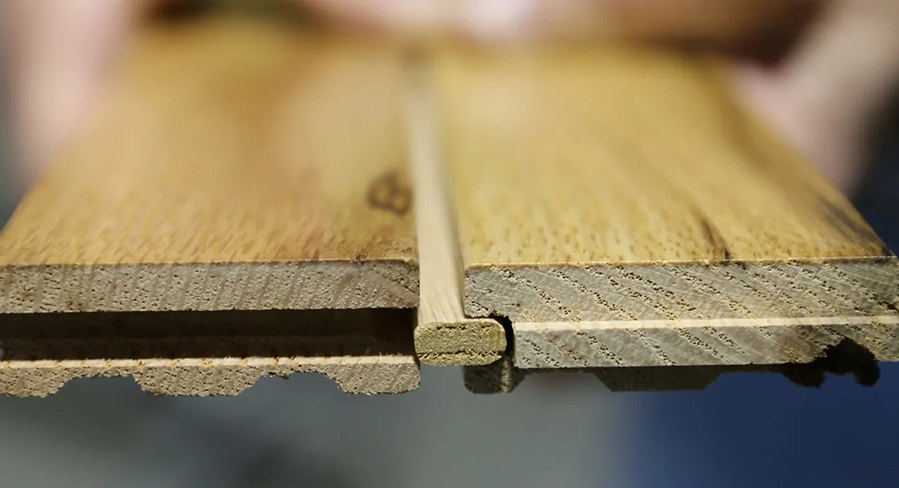
Manufacturing spline can be dangerous and tricky. The small profile of the material requires precision and a keen eye for quality. Todd Hooper, third-generation owner and president of Log Power, exclusively uses a kiln-dried, prime-grade poplar to produce his company’s spline. He says Log Power, which focuses solely on producing spline for the wood flooring industry and currently makes more than one million feet of spline each year, does this for a couple reasons: it is the cleanest wood to mill into such a small profile (oak splits too easily); and it is an inexpensive species (pine mills easily but is costly).
Some manufacturers also may create spline for five-eight-inch flooring and half-inch flooring, but this is uncommon. The reason is because not all groove profiles are identical for all flooring, especially when you get into the engineered flooring tongue and groove profile variances. In these cases, you may need to make your own spline. This can be done by using a table saw to rip down some quality plywood or flooring material to a dimension that allows the spline to snugly fit both grooves of two adjoining boards.
Installation of the spline is quite simple. There are just a few key things that need to be accounted for when installing it at the job. Cut a groove for the spline where necessary, using a router bit designed for the thickness of the flooring and the spline profile. Then, abut the spline to the length of the board or overall run. Use a polyvinyl acetate or carpenter’s wood. Apply a thin bead of glue to the bottom side of the receiving groove. Be careful not to overfill. Too much glue in the groove can cause the adhesive to push out and glue adjoining boards together. You don’t want this to happen. The objective is to simply glue the spline to the board it has been inserted into. Next, insert the spline into the groove. Once the spline is placed snugly in the groove, it should be nailed in place using a flooring nailer. Fasteners should be placed at the intervals necessary for the flooring being installed, per National Wood Flooring Association or manufacturer guidelines. To ensure the new spline remains in the proper position and and does not displace, use the groove side of a piece of scrap flooring to secure it while nailing it into place.
Brett Miller is vice-president of technical standards, training, and certification for the National Wood Flooring Association, an international not-for-profit trade association representing all segments of the hardwood flooring industry. Brett has been in the hardwood flooring industry since 1991. His passion began as an installer, sander and finisher of wood floors, and then progressed to being a successful business owner, wood floor inspector, commercial and residential project manager, regional manager for a large finish manufacturer, technical standards writer and an instructor. Brett can be reached at [email protected].