

How to Know a Subfloor is Ready for Heated Tile
By Julia Billen
Here is the counterintuitive truth behind almost every heated tile floor that fails: the heating element rarely dies on its own. The cable is designed to outlast the flooring above it. When something goes wrong, it is almost always the ‘product sandwich’ around the wire — the subfloor, bond, underlayment or pour — that fails first and and takes the cable with it.
The Four Root Causes
Flooring failures that trace back to the assembly fall into one of four buckets. Every subfloor should be evaluated against all four before it is considered ready.
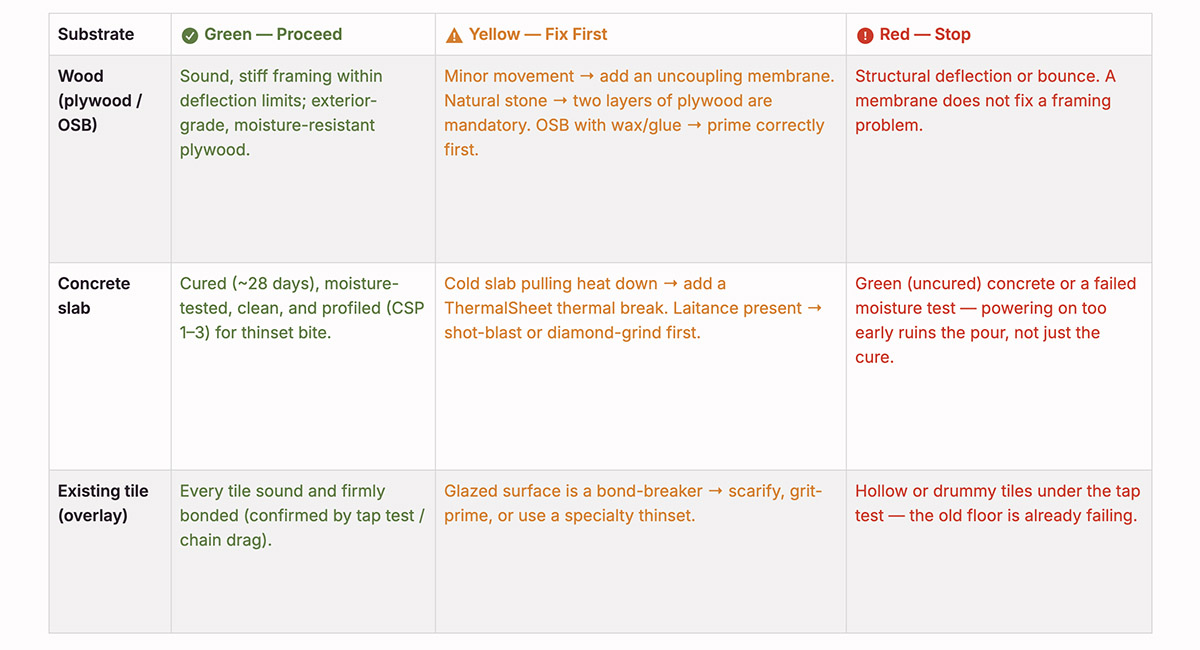
1. Movement and deflection. A subfloor that flexes cracks the tile and shears the bond. Wood-framed floors are the usual culprit; this is a structural problem, not something a membrane alone can rescue.
2. Moisture. Uncured concrete, damp slabs and absorbent wood substrates can all compromise the bond. Plywood and oriented strand board can draw water out of thinset mortar or self-levelling underlayment, leaving too little moisture for proper curing and weakening the bond.
3. Poor bonding and contamination. Thinset needs to bond to a clean, sound surface — not to dust, oil, curing compounds or a glaze sitting on top of it.
4. Wrong underlayment or a rushed install. Skipping cure times, choosing the wrong primer or forcing the schedule can turn a good product into a failed installation.
The Bond-breaker Rule
The single most common way installers cause their own failures is by leaving something between the mortar and assembly that prevents a proper bond from forming. The worst offender is duct tape.
Duct tape leaves a wide, non-porous footprint that mortar cannot penetrate, creating voids beneath the tile and increasing the risk of delamination over heating wires. The cable should instead be secured with dabs of hot glue every six to 12 inches. On wide spans where the cable can float to the surface during a self-levelling underlayment pour, short strips of half to three-quarter inch masking tape should be used every couple of feet, laid perpendicular to the wire — just enough to hold it down, never a continuous run.
The same principle governs the surface itself: it must be clean, sound and dry. The substrate should be wiped with a damp sponge to lift the fine dust the can’t be seen; otherwise, the bond is being made to dust. Remember: glazed existing tile is itself a bond-breaker until it is scarified or primed.
Choosing the Underlayment
The two options are a rigid layer, such as cement backer-board, or an uncoupling membrane. The choice should follow the floor’s needs, not habit.
Cement backer-board is the better choice when rigidity and cost are the priority over an existing wood subfloor. The critical rule is that backer-board must be installed beneath the heating element and screwed to the subfloor — never fastened over the cable, where a screw could go straight through the wire.
Uncoupling membrane isolates minor subfloor movement and helps limit crack propagation — making it well-suited to a small hallway bathroom. It is a zero-cure, controlled-climate assembly: the membrane is attached, the cable is set in its channels, and the surface is covered and tiled. Its low profile keeps the cable recessed, adding no extra height, and the channels help prevent the cable from floating during a pour.
Concrete and the Thermal Break Advantage
Bare concrete acts as a heat sink, drawing warmth downward and away from the room. A synthetic cork thermal break helps direct more heat upward and can improve heating efficiency by up to 50 per cent. It is worth stressing that a thermal break can still be needed even when the slab already has insulation beneath it: sub-slab insulation is not the same as a thermal break installed directly above the slab.
Self-levelling without the Float
Self-levelling underlayment is where good intentions fail fast. The substrate should be decontaminated, ground if necessary and primed with the correct primer for the substrate, while the primer’s tack window — roughly four to six hours, depending on the brand — is observed. Thinset should not be diluted and used as a substitute for self-levelling underlayment.
The crew should be planned accordingly: two to three people, multiple mixing tubs and no spiked shoes or gauge rakes that could nick the heating wire. Floor holes and air vents should be plugged before the pour begins or the underlayment can drain into the ceiling below.
Height Math and Transition Zones
The stack-up should be planned before installation begins. Total build up typically runs roughly three-quarter to one-and-an-eighth inch from the subfloor to the finished tile. A backer-board assembly adds approximately one-quarter to one-half inch; an uncoupling membrane assembly adds its profile; the thinset embedment bed is three-eighths inch, and the tile itself is typically three-eighths to one-half inch.
The working rule is a three-eighth inch thinset bed, with no more than an inch to an inch and a half from the top of the tile down to the heating cable.
Door clearance and swing should be checked, and transition strips should be planned early. The heating cable should be kept out of transition zones, as trim installers can inadvertently cut into thresholds and damage a wire routed through them.
Julia Billen is the founder, president and driving force behind WarmlyYours radiant heating, where she has led innovation for more than 26 years. Since introducing electric towel warmers to North America in 1995, Julia has transitioned radiant solutions from luxury upgrades into home essentials. As an industry expert, she serves on multiple standards committees, including UL and IEC, to shape global product safety and performance.