


Custom resilient installations
Proper quoting, planning and installation yield beauty and profits
By Christopher Capobianco
Like a challenging jigsaw puzzle, custom work in resilient flooring can be a huge challenge, especially those that have borders, medallions, or other custom inlay work. However, with careful planning, these jobs can be beautiful and profitable.
First, be sure there is an understanding of the cost of doing custom work. When I first started as a manufacturer’s rep, an architect asked for budget pricing on a solid vinyl floor tile. I gave him an approximate number and several months later he called, annoyed that a project he was involved with had bid out at almost double that cost. It turns out he had specified a custom installation in three colours with special shapes and sizes that had to pre-cut. The installation had to be done with union labour on weekends. This misunderstanding gave me a good lesson in knowing what you are quoting before you quote it.
Not quite cut-and-paste
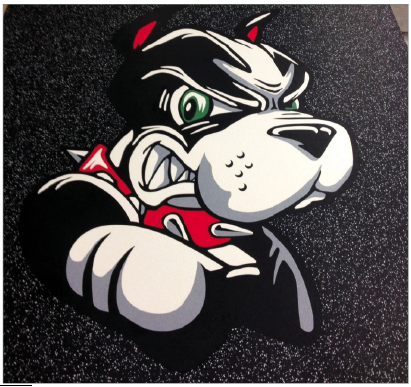
The hardest jobs to figure are the ones where the installer has to do all the cutting. It’s very hard to know how much time a job like this will take. It will involve a lot of communication between the installer and the owner or the designer that created the pattern. It is often necessary to sketch the pattern full size on paper or right on the substrate before you start cutting. Make sure the design is approved, because once it gets cut to fit, it may not be possible to change the design.
Many times, custom designs will arrive to the jobsite having been prefabricated, either by a water jet or ultrasonic cutting system that uses computer-aided design (CAD) programs to create the design. The cutting is done on a table designed specifically for this purpose.
The process of taping
The designs are created and assembled by the fabricator using clear tape on top if the material to hold the pieces is in place. On larger designs, there will be a number of sections, so step one is to lay them out on the floor dry to be sure you have all the parts. Once you install, you might have to add additional tape to hold the pieces together until the adhesive sets.
As far as installing these projects, substrate preparation and concrete testing are critical. These are expensive floors, so failures because of moisture or floor prep are that much more expensive to repair or replace. A dip or a high spot in the floor could cause one of your small puzzle pieces to become damaged or, even worse, to come loose. Make sure the floor is flat, smooth and dry!
Temperature is another concern. Many resilient products are sensitive to extremes of temperature — more sensitive than most people in the flooring and construction trades know. The material and the jobsite need to be acclimated to eliminate any concerns about the material shrinking or growing because of extremes of temperature.
The same thing holds true when you cut the material. Don’t use heat to warm the tile for field cuts. Warm product can be stretched during handling or installation or can expand slightly because of the heat. If material is installed in this state, gaps may show up when the material returns to its original size after cooling. Make sure the building is climate controlled and the material is on site for at least two days before installation.
Adhesive selection for custom work is very important, so consult the manufacturer of the flooring. I prefer to use a two-part epoxy adhesive for several reasons. First, because the epoxy is a “wet lay” system, it is not difficult to slide the flooring into place for a tight fit when putting together a pattern with a lot of small pieces. That’s a lot easier than a tacky type of adhesive that grabs immediately.
Hard as a rock
Second, because epoxy sets so hard and is highly water resistant, I am less worried about the small pieces in a custom design becoming damaged during use by wear and tear or excess water on the surface of the floor. Epoxy sets hard as a rock, so if you get the floor laid tight and flat, it will stay that way once the adhesive cures. That being said, always check in with the manufacturer’s technical department and see if they have suggestions. Chances are you are not the first one doing this type of project with their material.
Before starting the installation, placement of the material is key. Take careful measurements to be sure the patterned elements are exactly where the customer wants them. It’s wise to install the patterned sections first or last and keep ALL traffic off that part of the floor for a day or two so the adhesive is solid.
The day after installing, go back to the job to make sure everything is right, and remove any tape from the surface of the floor. Don’t delay this part of the job. I remember one installation where the installer never removed the clear tape, and the maintenance crew went in and started cleaning the floor with a scrubbing machine. The heat that the pads generated caused the adhesive from the tape to really bond to the floor and it was a major job getting it off.
On new construction jobs, before you walk off the site, find someone in authority and alert them to the fact that there is a brand new custom floor installed. It needs to be protected if there will be more construction work going on.
Finally, when the job is done and the building is occupied, make arrangements to get back to the job and take some pictures. Nothing looks better in a portfolio than photographs of a beautiful custom installed resilient floor.
Christopher Capobianco is a flooring expert currently working with Forest Hill, Md.-based Spartan Surfaces, a distributor of commercial hard-surface flooring. Chris’s family lineage in floorcovering goes back for generations. His career includes time as a retailer, architectural sales rep, technical support manager, consultant, instructor, columnist and active volunteer in several organizations.